Use AI Models in Your Swift Application

João Pedro Maia, a software engineer at aiXplain, provides a detailed guide on seamlessly integrating powerful AI models into Swift applications using the latest Swift SDK, aiXplainKit. This SDK simplifies the process by offering access to over 35,000 AI models through a single API, allowing developers to enhance their apps without incurring additional costs compared to going directly to model suppliers. In this tutorial, João demonstrates how to build a recipe generator app, showcasing aiXplainKit’s capabilities.
Overview of aiXplainKit Integration
This tutorial is organized into three key sections:
- What is aiXplainKit?
- Choosing the right AI models on aiXplain Studio
- Implementing AI models in a Swift app
By the end of this guide, developers will have a solid understanding of how to leverage aiXplainKit to introduce AI-powered features into their Swift applications.
What is aiXplainKit?
aiXplainKit is a Swift SDK designed by aiXplain to enable effortless integration of AI models into iOS, macOS, and other Apple platform applications. It offers a unified API that connects developers to a marketplace of over 35,000 AI agents, making it easy to select, configure, and implement AI models in their apps. Importantly, using aiXplainKit does not add extra costs compared to accessing AI models directly from suppliers.
Step 1: Choosing the Right AI Model
Selecting the appropriate AI model is essential for addressing the specific needs of any application. Here’s how developers can choose the right model for their project:
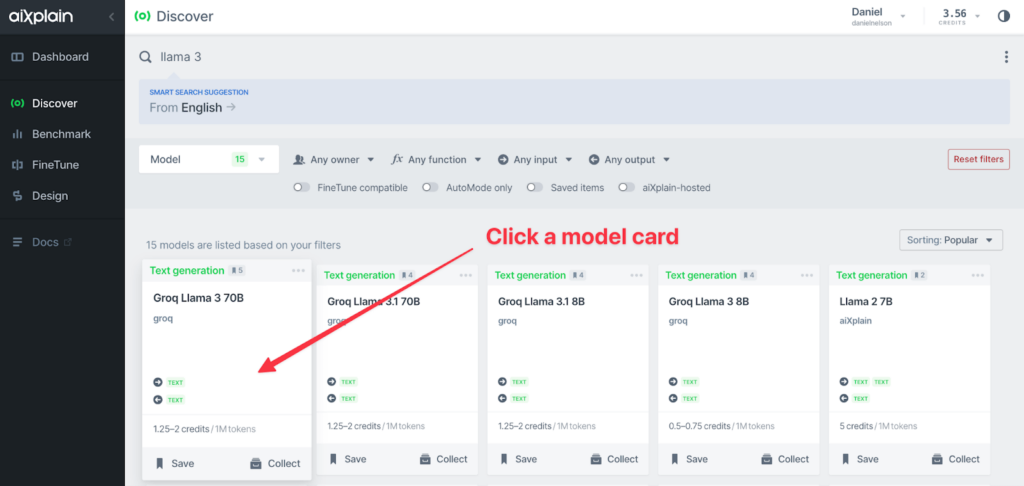
- Visit aiXplain Studio: Start by exploring the various AI models available on our platform. For instance, a text-generation model was needed in the Kitchen Guru project to create recipes based on user-provided ingredients.
- Use Discover: Utilize Discover tool to search for models by function. In the Kitchen Guru example, the “Llama” model provided by Groq was selected due to its speed and reliability in text generation.
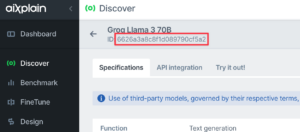
- Select and retrieve the model ID: After choosing the appropriate model, developers can click on the model’s card to retrieve the model ID, essential for integrating the model into their Swift application via aiXplainKit.
Step 2: Setting Up aiXplainKit in a Swift Project
With the AI model selected, the next step is integrating aiXplainKit into a Swift project. Here’s how to do it:
- Import aiXplainKit using Swift Package Manager: In Xcode, navigate to the Swift Package Manager and add aiXplainKit to the project using the GitHub link in the video description.
- Configure the API key: Setting up an API key is necessary to authenticate the app with the aiXplain platform. Here’s a simple way to do it:
import aiXplainKit
func configureAPIKey() {
    AiXplainKit.shared. keyManager.TEAM_API_KEY = "0d2ddc15"
}
Developers should ensure the API key is stored securely in a production environment.
Step 3: Integrating and Using AI Models in Swift
With aiXplainKit configured, developers can now integrate and use the selected AI model in their Swift app:
- Fetch model information: Begin by retrieving the model information using the model ID.
func fetchModels() async {
let modelProvider = ModelProvider()
self.llama3 = try? await modelProvider.get("66b270bb6eb56365551e8c71")- Set up the model prompts: Customize the prompt to tailor the AI model’s responses to the application’s needs. In the Kitchen Guru project, for instance, the prompt directs the AI to generate recipes based on a list of ingredients.
Help users generate recipes based on a list of ingredients
they provide
Here, we are telling the AI that it will be used as an assistant to generate recipes based on a list of user-provided ingredients. The input format is clearly defined, so the AI knows exactly what to expect.
You are an AI assistant designed to help users generate
recipes based on a list of ingredients they provide. Users
will give you a list of ingredients in the following
format:
ingredient qty? unit?

For example:
Cheese 100 mg
Eggs 2
Meat
Salt- Generate recipes with AI: Once the AI has received the input, it generates a recipe in JSON format. It’s important to ensure the output is strictly in JSON format, with no additional formatting or information.
The JSON includes a title, a brief recipe history, and a step by step instructions.
Based on this list, generate a recipe. The recipe should
always return ONLY the following JSON: no more information,
just the JSON without any kind of formatting
'''json
{"title": "Recipe title",
""recipe History": "recipe history in 1 paragraph",
"instructions":
["instruction 0","instruction 1",…"instruction n]}This function is the heart of our AI-powered recipe generation. It takes an array of ingredients as input and returns a picture of a recipe object.
The async keyword indicates that this function performs a synchronous operation, which is crucial when working with AI models. The throw keyword means it can throw errors, allowing us to handle potential issues gracefully.
func create Recipe(using ingredient List: [Ingredient]) async throws ->
Recipe?{}
The first step in our function is to ensure we have access to our AI model. We use a guard statement to check if the Llama 3 model is available. If not, we return new, gracefully handling cases where the AI model isn’t accessible.
func create Recipe(using ingredient List: [Ingredient]) async throws ->
Recipe?{
   guard let llama3 = self.llama3 else {
      return nil
   }
}
Let’s prepare the list of ingredients for the AI model.
Here, we convert our list of ingredient objects into a single string. This step is crucial because our AI model expects input in a specific format. We iterate through each ingredient, appending its description to our string. This process transforms our structured data into a format AI can understand and work with.
func createRecipe(using ingredient List: [Ingredient]) async throws ->
Recipe?{
   guard let llama3 = self.llama3 else {
      return nil
   }
   var ingredients As String:String = ""
   for ingredient in ingredient List {
      ingredients As String.append(ingredient.description)
   }
Now comes the exciting part: Interacting with our AI model.
func createRecipe(using ingredient List: [Ingredient]) async throws ->
Recipe?{
   guard let llama3 = self.llama3 else {
      return nil
   }
   var ingredients As String:String =
   for ingredient in ingredient List {
       ingredients As String.append(ingredient.description)
   }
   let model output = try await
   llama 3.run(["data":ingredients As String, "context":Llama System Context])
   let recipe = try Recipe(model Output.output)
   return recipe
}
This is where the magic happens. We call the run method on our Llama 3 model, passing in our ingredients string as data and a predefined system context. The await keyword is crucial here, as it allows our app to remain responsive while waiting for the AI to generate the recipe.
Once we receive the output, we attempt to create a recipe object. If successful, we will return this recipe. If any error occurs during this process, it will be thrown and can be handled by the calling function.
 let modelOutput = try await llama3.run(["data":ingredientsAsString,"context":LlamaSystemContext])
        let recipe = try Recipe(modelOutput.output)
        return recipe
Let’s Start Cooking
After successfully integrating the AI model into the Kitchen Guru app, João Pedro invited his colleagues to test the app by submitting their favorite ingredients. This section showcases the excitement of putting the app to the test.
“Okay, let’s start cooking!” – João Pedro Maia
He inputs various ingredients into the app, and within moments, the AI model generates a unique recipe based on those inputs. For instance, after entering ingredients like rosemary, pasta, and olive oil, the app quickly produces a delicious Rosemary Pasta recipe.
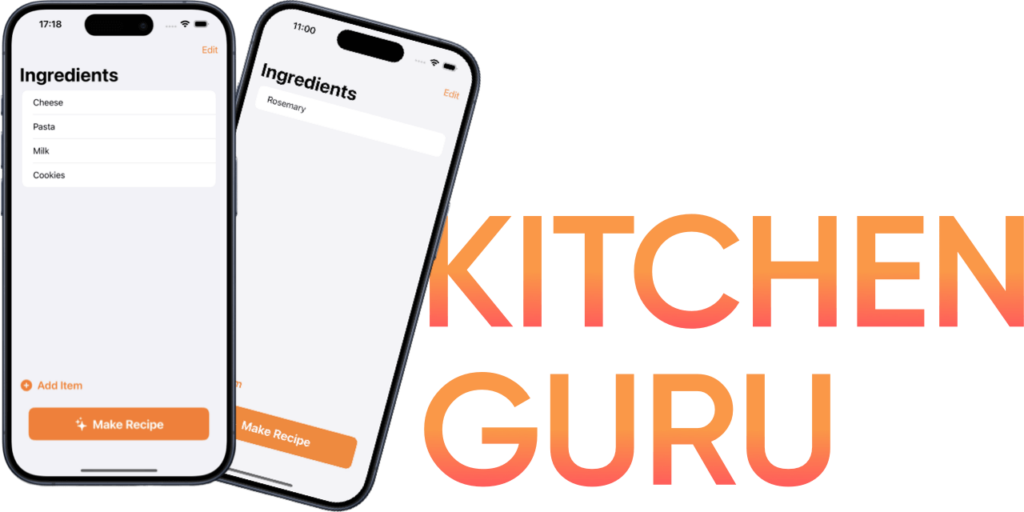
The impressive results demonstrate how the Kitchen Guru app can turn a simple list of ingredients into a gourmet dish, all powered by aiXplainKit’s AI models.
Conclusion
aiXplainKit simplifies integrating AI models into Swift apps. This allows developers to add advanced AI features with just a few lines of code and no additional cost compared to accessing models directly. Whether building a recipe app like Kitchen Guru or developing a different application, aiXplainKit provides the tools necessary for success.
Developers can refer to the resources in the description for further details, including links and the Kitchen Guru project files. This guide is valuable for any developer looking to efficiently and affordably add AI capabilities to their Swift applications.
 We have cookies!